Mom’s Button Tin

Mom's Vintage Button Tin Today my sister reminded me of my mom’s button tin.

Some of my earliest memories are of my fingers sifting through this smorgasbord of buttons when I was too small to even get the lid open by myself.

As I grew older, on many occasions, I’m sure I dumped the contents all over the floor and watched the discs roll in every direction. Then I painstakingly searched all the nooks and crannies until they were safely recovered.

My mom wasn’t really what you would call a seamstress. She didn’t make our day-to-day clothes, but as someone who grew up during the depression she could handle any utilitarian task.

For years she created our Halloween costumes from scratch with lots of hand sewing involved.

She taught me how to sew on a button. I replaced missing buttons on my clothes,  but also used them to make eyes for my sock puppets.

Mom also taught me how to mend the holes in my socks, which wasn’t so easy. I really didn’t like wearing socks that had been mended, because the repaired spot was always lumpy and felt strange. Sometimes it rubbed the wrong way on my feet and just bugged me. When I got older I decided that socks were cheap enough that I could get new ones instead of having to mend them.  Now I use them for cleaning rags when they wear out. It’s much easier on my feet and my mending pile.

My Barbie doll wardrobe was created with a running stitch at the edge of a piece of fabric, carefully gathered into the shape of a flowing skirt.

I can still sew a mean blind stitch to hem my pants and dresses. I’m not sure if I learned that from her or in my 7th grade Home Economics class. Every person in the 7th grade, boys and girls included, were required to take Home Economics and Wood Shop.  I loved them both! Home Ec was the class where I learned how to sew on a machine.  We practiced curves and corners on paper without thread to begin with, then graduated to thread and eventually to fabric.  I still remember the gold pin-wale corduroy jumper that I made in that class.

I don’t remember my mom having a sewing machine. Everything she did was by hand.

Mom’ll be 90 years old in January and she’s still proficient at hand sewing. She hems her own pants, shortens and hems her shirt sleeves – they need to be 3/4 length, otherwise they get in her way. She also adds darts to the shoulder area of her blouses because her shoulders are rounded and she needs them to fit better.

Between my mom’s hand sewing lessons as a child, a hand quilting class that I took as a young wife and my Home Economics classes in Jr. High, I feel fairly comfortable with sewing.

I made several outfits for our kids when they were toddlers, sewed a red and blue baby quilt for my sister’s oldest son, Jason (I wonder what happened to it), made a fabric baby doll from scratch for my daughter, various crafts and some nice quilt squares that are still laying around somewhere. Someday maybe one of my kids or grandkids will make them into pillows or wall hangings or something.

Now, I’ve become the proud guardian of Mom’s lovely vintage tin filled with all sorts of buttons. When she was moving a year or so ago she was trying to simplify and decided that she didn’t need them all. She let me have the whole spectacular tin.

It’s more than just a button tin though.  It’s filled with so many precious memories.  2013.08.28 Mom's Button Tin 008 (640x424) 
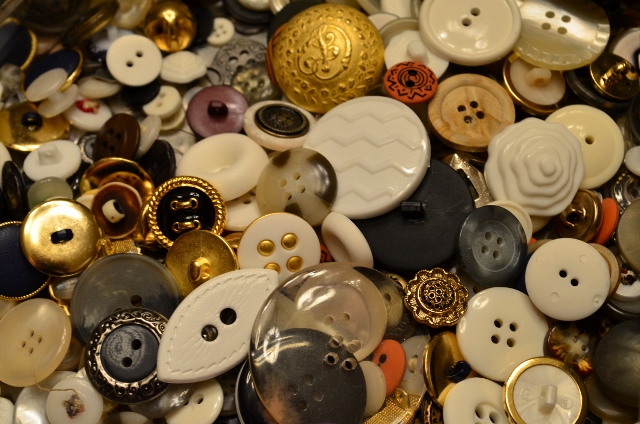
Do you have a button box? Did your mom teach you to sew?

I’d love to hear about your memories…

Easy Upcycled Sailboat Gift Bag

You may remember when I posted about the upcycled gift bag that I made for a baby shower gift recently.  It was actually a design that could be used for most any gift and this one is much the same.

My friend, Sharon loves all things coastal, but isn’t really keen on the traditional blue and green color schemes, so for her birthday I decided to make a sailboat gift bag with some non-traditional colors.

Once again, I pulled out one of my large bags.  This time a traditional brown bag.  I dug through my scrapbook papers and found some lovely plaid, starburst and print papers.

Initially I did a Google search for images of a sailboat line drawing that I thought I could trace.  After looking them over, I couldn’t find what I had in mind so I just looked at a drawing for ideas and created the pieces from scratch.  They’re all pretty basic shapes, so it was easy.

Sailboat gift bag

Just for fun I printed the name of the ship on the orange plaid paper that would be used for the hull and the mast.Sailboat gift bag flag

I added cute brass star-shaped brads to the pennant shaped flags at the top of the mast.

And check out the words on this fun paper that I used for the waves.  Rusty orange print to coordinate with the other papers, and words like surf, wave, tide and cool!

And here’s the finished product – full view of the bag.  Added an orange plaid tag and bright yellow tissue paper to complete the look.

What do you think?  Can you give me ideas for other gift bag designs? I may just make your suggested creation.

Sharing the fun at:
shabby creek cottage

Simple All-Occasion Upcycled Gift Bag

Color Coordinated Upcycled Gift Bag

Here’s a fun and easy project that you can easily do in under 30 minutes the next time you need a gift bag.

Have you visited a shop or restaurant that uses plain white or brown paper bags for their products?  If you keep your eyes open you’ll find that there are some that do this instead of paying for printing on their larger size bags.  Every time I get a blank bag (or even one with a smaller graphic) I save it for future upcycling.

Today I needed a bag for a baby shower for Baby Boy Bryson, a new addition to our extended family, so here’s what I did.

  1. First I pulled a medium size white bag from my stash
  2. Next, I looked through my supply of fabric ribbon and found this great blue & purple plaid.  Perfect for a little boy.  (Shop for ribbon at craft stores when it’s on clearance or you have a coupon.  Also watch for ribbon attached to cards and other products that you can rescue.)
  3. Then I searched through my scrap-book paper and found a thick striped sheet in shades of blue that coordinated with the ribbon.  A nice baby print would be great too.
  4. Open up Microsoft Word (or an appropriate program) to create a single large letter (or word of your choosing).  Select your preferred font and size large enough to fill the page and/or one side of the bag.
  5. In MS Word you can choose the option to show/print the letter as an outline only.  This is the best way to show the pattern to be cut out of the printed paper.
  6. Print the letter/word on your scrap-book paper and cut it out.
  7. Center and attach it to the side of the bag with your favorite paper glue.
  8. Fill the top of the bag with tissue paper (would have been more striking if I had a light shade of blue that matched the ribbon).
  9. Tie your matching ribbon in a bow on top of the bag.
  10. If you need a tag, cut a circle or creative shape out of the scrap-book paper too.  Punch a hole in it and tie it on with a small string or matching ribbon.
  11. That’s it!  You’re ready to go.
  12. Imagine all the possibilities…unlimited color schemes, print a word instead of a letter, trim the bag with lace for a girl.  Or what about using the same idea for mini-size wedding or birthday favor bags?

Have fun and post a link to your own creations in the comments section!  I’d love to see how you make it even better.

Easter Branch Decor

Can you believe that Easter is right around the corner?  I know!  I can’t wait to show you my latest update for my seasonal branch.

As you may remember, here’s my hubby, so excited about my fabulous find.  He just didn’t quite understand the vision of the branch, but was so sweet to empty the trunk of suitcases so that we could squeeze it in and transport it home from Sedona.  Click here for a bit more of the story.

This year I found some hanging egg ornaments with letters to spell out Happy Easter!  It was so easy to hang the letter eggs on a thick ribbon that was strung between the branches.  Of course, I added a variety of pastel eggs, as well as several celery green crystals to fill in the spaces.

Happy Easter Egg Ornaments

I love having this branch in my living room.  It’s so much fun to think of all the possibilities for decorations.  What would you use to decorate it?

5 Easy Steps to Re-Use Thank You Cards

You know when you get a card and you love the design just too much to throw it away?  Well, here’s a fun way to give new life to that favorite card front.

In this case I’m repurposing thank you cards.  It’s so easy and takes very little supplies to create a whole new card to use yourself.  And if you end up sending it to the person that gave it to you in the first place they’ll be honored that you liked it enough to re-use it, and you’ll be making it even better than when you first received it!  (Be sure to click to enlarge the pictures to see all the details.)

Thank you card tools

Step 1:  Pull all your favorite used thank you cards out (ones that you’ve received and saved) and use a paper cutter, like the Fiskars one pictured to the left, to separate the front from the back (used-written on) part of the card.

Step 2: Find some envelopes that are the approximate size of the notecard fronts.  These can be found at various stores like the box of “100 Invitation envelopes” pictured below or online like this set of envelopes at CurrentCatalog.com.  You can buy just white or a variety of colors.  Or if you want to be really industrious, you can make your own envelopes from any number of tutorials online by searching “How to Make a Paper Envelope”.

Step 3: Cut pieces of coordinating paper or cardstock Notecard envelopesjust a little larger than double the length of the old thank you note covers.  You will be folding these in half to create the card, so if the old card front is 4″ x 5″ for example, the new card stock should be at least 8 1/4″ x 5 1/4″.  It’s nice to leave an extra edge around the old card front for contrasting colors as you’ll see on my samples.  Note: make sure that the card will fit into the notecard envelopes that you have.  You can size the card stock accordingly, or depending on the design, you can cut down the old card front to fit the envelope.

Thank you cards done #2Step 4:  After you have cut out a coordinating piece of cardstock or heavy paper (like scrapbooking paper), fold it over to make the new card.  Now, with a little creativity,  here are just a few ideas of things you can do before attaching the old card front to the cardstock.

  1. Use a corner rounding or creative corner tool to decorate or cut the corners on the old card front, or the cardstock or both.
  2. Add a layer of contrasting paper between the two layers as in the beige and white card shown here.  The original thank you card was white with a formal font, so I added a classic lined paper between the two layers with a half circle of the lined paper under the words.
  3. Add buttons to the design where appropriate.  In the flower card at the top, there was already a tiny button used for the center of one of the flowers.
  4. Add ribbons, bows or stickers or your own decorative ideas where appropriate.  I’m sure you have some great ideas here!

Step 5: Attach the card front and decorations to the cardstock using either glue, adhesive dots (found at your favorite scrapbook supply store) or double-sided tape.

Wasn’t that fun and easy?  I love the fact that this can all be done in less than an hour and you have a whole new stock of cards to use. How do you reuse your thank you or greeting cards?  I’d love to get your ideas!  Thanks for stopping by.

Happy Valentine’s Day Friends!

I hope you had an extra special day with the ones you love!  I hope you enjoy these photos of my Valentine Branch.  Don’t you just love this sweet little owl.  He was a gift from my friend, Sharon.  The branch hangs in my living room throughout the year, all decorated for each season.

I also wanted to post a quick note to apologize for being MIA for a while.  I didn’t realize how long it’s been.  There’s so much to report and there has been so little time to report it.

This past weekend we were in Puerto Penasco, Mexico.  It was the first time I’ve been there.  The Catfish Hunters did a concert on Saturday night and we had a great time!  Pictures to come soon.

More big news and probably a little bit of an excuse as to why I haven’t been on my blog too much.  I just received in the mail the book that I created through Blurb.com!  It was a (mostly) photo travel book about a trip that I was privileged to take to Israel and Jordan in October with a non-profit organization that I work with.   The book is 12″ x 12″ and 200 pages (yes, you read that right).  It turned out beautifully if I must say so myself!  I’ll have pictures of that and a link soon too!

I also had the privilege of planning a celebration for a dear friend of ours…of course there are photos of that on the way too!

See, I really do have a few good reasons for not being online.  Just sorry that it kept me away from all my friends here.  See you soon.  I promise.